Showing posts with label Recipes. Show all posts

Wednesday, January 27, 2010

Rosemary Roast Potatoes


I love rosemary, especially with potatoes. Here's a simple, tasty recipe for rosemary roast potatoes:

Preheat oven to 400 degrees F. Oil a nonstick roasting pan.

Slice four medium potatoes (Russet or waxy variety) into quarter inch rounds using a food processor or knife. Put slices in mixing bowl with 2 to 3 tablespoons fresh, coarsely chopped rosemary and salt and pepper to taste (I use about 2 teaspoons salts and three shake s of pepper). Pour in about 3 tablespoons canola or olive oi.

Stir and dump potatoes into the roasting pan. Try to distribute evenly, but potatoes need not be in a single layer. Put the pan in the oven and set timer for 10 minutes. After the timer dings, remove and with a spatula turn the slices. Return to the oven and set timer for another 10 minutes. Repeat until golden, about 50 minutes

The finished product is wonderful, flavorful and aromatic with textures ranging from crispy to firm. Some slices turn into dark potato chips, tasting like the slightly burnt Wise Potato chips of my youth, only better. Goes with pretty much anything, meat, fish, fowl.

Monday, January 25, 2010

Decorating Adventures


My daughter decided last weekend that she wanted to bake a cake and decorate it. Actually, decorating was what she was really interested in. And she doesn't much like cake.

We compromised and made a half batch of cupcakes. We bought a pastry bag and some tips (cost about $6). Ambitious as always, my daughter really wanted to make a rose.

She didn't succeed, but I thought her results (see above) were pretty impressive for a first try. It was her idea to use food coloring in the pantry for the different colors.

We used a simple cake recipe with egg whites and a whipped cream frosting, cutting both in half. The cupcakes were delicious, very light, almost ethereal. Yet another example of even the simplest food made at home being better than what you buy at the supermarket.

Tuesday, January 12, 2010

Oatmeal Crispies


My mother is a talented if unenthusiastic baker. Her pies are far and away the best I've ever tasted, so good that I never order pie at a restaurant because I'm always bitterly disappointed. She also bakes outstanding cookies and desserts like date nut squares. Not that she makes a big deal about it. Far from it. Mom has always been much more interested in art and art history (she is a retired art history professor) than the domestic arts.

The other day, mom gave us a new recipe, oatmeal crispies. They were outstanding. She emailed me the recipe and I tried them this weekend.

The recipe, which follows, was straightforward: cream shortening (gets a bad rap. Actually much less saturated fat than butter), sugars, eggs, etc. add flour, oatmeal and crushed walnuts, cool dough in fridge and bake.

A few tips. I made my dough log too thick, so the cookies, while tasty, came out the size of hockey pucks (see above). Too big. I should have cut the dough into two or three pieces and shaped each into a log. I also didn't keep the dough in the fridge long enough. As a result, it was too soft, making it hard to slice into rounds for baking.

Lastly, I had to crush the walnuts because my wife doesn't like certain kinds of nuts (only certain kinds, mind you, not all) unless they are in microscopic pieces. I achieved this by putting the nuts in a plastic bag and pulverizing them with a meat mallet.

A great recipe. Here it is:

1 cup shortening
1 cup brown sugar tightly packed
1 cup white sugar
2 eggs beaten
1 tsp vanilla
1 1/2 tsp cups flour
1 tsp salt
1 tsp baking soda
3 cups oatmeal
1/2 cup chopped (in my case, crushed) walnuts

Cream the shortening, sugars and eggs. Add vanilla and mix well. Add flour, salt, baking soda, oats and nuts and mix well. Divide dough into two or three pieces, depending on preferred size of cookies, and shape into logs. Wrap in wax paper and refrigerate at least two to three hours.

When ready to bake, preheat oven to 350 degrees. Remove dough, slice into quarter inch rounds and place on ungreased cookie sheets. Bake about 10 minutes and cool on wire racks.

Wednesday, December 30, 2009

Vegan Dessert


Our friend Kerri, who is a vegan, came to dinner last night. Main course was easy: homemade marinara and spaghetti, salad and garlic bread painted with olive oil instead of smeared with butter. I browned ground beef in a separate pan and added to ours.

The challenge was dessert. Our kitchen is bursting with Christmas cookies and confections, all containing dairy products that Kerri does not eat. What to make that would be tasty, quick and animal free?

The solution: sorbet. I'd never made sorbet before, but I'd long wanted to try. Plus I still have two giant bags of raspberries in the freezer from our berry-picking expedition last fall.

Obviously, the berries -- especially raspberries -- would need a lot of sugar. I consulted several cookbooks and concluded that I needed to make a syrup. How many times have we heard that on Top Chef or Chopped? The chef needs to throw together something sweet and he or she says, "I decided to make a simple syrup."

I can report it really is that simple. I put two cups of sugar and one of water into a pot, brought to a boil and stirred. After about a minute, I had clear, sweet, somewhat viscous syrup that tasted wonderful.

How easy. I couldn't help think this is one of those basic, simple recipes that has been lost over time. Who needs processed drinks and pre-sweeted foods when it's so easy to make your own all-purpose sweetener?

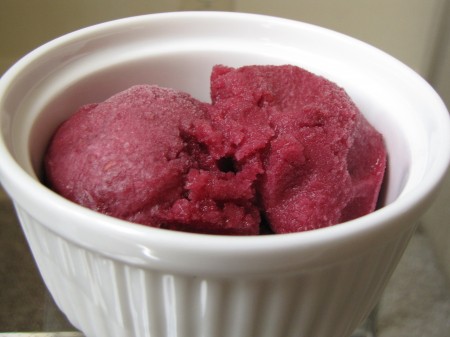
I pureed two cups of raspberries and pushed the dense red liquid through a sieve. I then added a tablespoon of lemon juice and put the mixture in the fridge to cool. After about an hour, I took it out and added about half a cup of syrup. It tasted perfect, sweet, but not overwhelmingly so, with a powerful raspberry flavor.

I put the mixture in my ice cream maker and in about 20 minutes had about 1 1/2 cups of soft, dark red sorbet.

It was a huge hit. Kerri, my daughter and I all had some, scarfing it down in record time.

A wonderful, relatively quick and easy dessert. And I can't wait to make some lemonade with the remaining syrup.

Sunday, December 20, 2009

Mid-Winter Toasted Marshmallows


My daughter has a thing for marshmallows. Always has. Plain, toasted, in smoores, you name it, she scarfs them down.

One winter day, she decided that she wanted toasted mini-marshmallows. Her idea was to toast them in the toaster oven. I was dubious. I feared they would explode into gross globs of goo. But you have to let kids experiment, so I agreed to let her try.

She proceeded to cover the toaster oven pan with tin foil, lay down marshmallows and put it in the toaster oven for about three minutes. To my amazement, they came out perfectly. Brown on top and gooey on the inside.

With a snowstorm bearing down on us last night, my daughter made them again for her dessert. The photo above is of the result. A taste of summer in the depths of winter.

Tuesday, December 15, 2009

Thyme Chicken Salad


I had a ton of leftover thyme from a recipe I made this weekend. Always on the lookout for new, low cholesterol lunches, I finely chopped about half a teaspoon and added it to my standard lunch, pre-poached, shredded chicken breast. Salt and pepper to taste and teaspoon of olive oil completed the dish.

Excellent. The thyme flavor came through beautifully and the olive oil made the chicken rich and warm. A find.

Monday, December 7, 2009

Game Day Flank Steak


I attended my annual New York Giants game yesterday at Jimmy Hoffa Memorial Gardens just off the scenic New Jersey Turnpike. My college roommate Dave has season tickets and invites me to a game every year, usually with his med school friends Jock and Andy.

Of course, tailgating is de rigour. Some fans go to great lengths, bringing home-made smokers and full-sized Weber grills. Others drive RVs with full kitchens into the parking lot, raise Giant and American flags and lay out lavish spreads. One parked RV had a flat bed trailer with a hot tube run by a gasoline generator. After the game (Giants won 31-24), two guys were in it drinking beer and making mayhem.

The guys next to us were culinary students who grilled skirt steak, opened up shellfish in a big steel pot on a charcoal grill and finished it off by melting butter in the same pot and drizzling it on Italian bread for garlic bread.

I usually make hamburgers for the crew, but this year I decided to do flank steak, potato salad and green salad. The flank, cooked over a charcoal fire on a rickety, but effective grill, was a big hit. Here's the recipe:

1 to 1/2 lb flank steak
2 tablespoons chopped fresh rosemary
2 tablespoons chopped fresh basil
1 large or 2 to 3 small minced garlic gloves, depending on taste
2 to 3 teaspoons kosher salt, depending on taste
1/4 to 1/2 teaspoon pepper, depending on taste
3 to 4 tablepoons extra virgin olive oil

(You can use just about any herb or spice, although I find the rosemary and garlic are musts)

Preheat a grill or broiler. Mix the garlic, salt, pepper and herbs in a small bowl. Put the steak between sheets of wax paper and pound to about 1/2 inch thickness. Paint on olive oil and rub mixture onto meat. Turn over and repeat. Place on grill or under broiler (if it doesn't sizzle, you're grill's not hot enough), about 4 to 5 minutes a side for medium rare.

Put meat on cutting board with gutters to catch the blood. Let meat rest at least 5 to 10 minutes (We covered it because of hte cold) and then carve against the grain into strips. Serve with potato salad and green salad. Corn on the cob is also an excellent accompaniment, if in season.

To sum up, great company, great food and a great game. Life doesn't get much better.

Saturday, November 28, 2009

Pumpkin Pie Extraordinaire


I never ate pumpkin pie growing up. My parents were never big on it, so it didn't appear on our Thanksgiving table.

My wife's family, however, enjoys a good pumpkin pie, so after I got married I finally tasted it. I liked it and have had a piece at Thanksgiving ever since.

All the pumpkin pies I've eaten have been store bought, perfectly round discs with orange filling. So when my wife's friend Cheryl gave her a recipe, we took up the challenge.

I started with my mother's pie crust, which is deceptively simple. For a 9 inch pie crust, freeze a stick of butter for about an hour. This is vital because key to a good crust is keeping the little bits of butter intact within the dough. If you don't freeze the butter, it gets mushy as you cut it and you end up with butter smears into of pieces.

Cut the frozen butter into small pieces (as small as you can get) and work into a cup and a half of flour with 1/4 teaspoon baking power and a pinch of salt. I use an up-and-down motion with a whisk with a bulb on the end. Add six to seven tablespoons of cold water and mix with a spoon and then by hand into a ball. The trick is to use as little moisture as possible to form the ball. The less moisture, the flakier the crust.

Flour the counter and roll out the crust. Shape into a greased a 9 inch pie plate and build up the sides. I was somewhat flummoxed by this. My wife took over. Instead of pressing the crust onto the edges as with an apple pie, you literally build a straight, up and down parapet around the circumference. You want it about an inch high from the bottom of the pie plate. Don't be surprised if you have extra dough.

As I made the crust, my wife made the filling. She slightly beat 2 eggs and then beat in 1 can of pumpkin filling (about two cups), 1/4 cup each of white and brown sugar and maple syrup, 1/2 teaspoon salt, 1 teaspoon cinnamon, 1/2 teaspoon ground ginger, 1/4 teaspoon cloves and 1 2/3 cup evaporated milk. For extra bite, you can add 1/4 teaspoon of all spice. We did not.

The filling was very thin, nearly as thin as water. Fear not. All is right with the world.

Put your pie plate with the crust on a tin foil-lined cookie sheet in a pre-heated 450 degree F oven. Transfer the filling (it's about four cups) into a measuring cup or other spouted vessel and pour into the shell.

After 15 minutes, lower the temperature to 350 and bake about another 45 minutes. The pie is done when a thin knife in the center comes out clean.

The recipe worked like a dream. The pie was perfectly set after the full baking time, rather amazing considering how soupy the original filling was.

The result: the best pumpkin pie I've ever tasted. Everyone loved it at Thanksgiving.

A huge success. Thank you Cheryl!

Sunday, November 8, 2009

Quick Raspberry Sauce


Earlier this fall, my mother-in-law suggested that my daughter and I go raspberry picking with her at a local farm. It was a smashing success. About two hours of pleasant work yielded us about five pounds of raspberries. The cost: about $25. Considering that you pay $3 or more for a small container of inferior berries at the store, a bargain.

We gorged ourselves for a day or so. I used some to make raspberry-peach pie, which was superb, a near perfect balance of sweet and tart. Using my mother-in-law's system, I froze the huge surplus on cookie trays without washing them and stored them in plastic bags. I've been having a bowl for breakfast every couple of days ever since.

This weekend, my daughter had the idea of making another raspberry-peach pie after I spotted some peaches in the store. I unthawed a cup, but when we returned to the store, the peaches were gone.

Left to her own devices, my daughter added some sugar and cinnamon to the raspberries and stirred. The peaches, already soft from having been frozen, quickly broke down. The result was a pleasingly tart, slightly cinnamony raspberry sauce. Excellent. We'll have it tonight on ice cream or perhaps with our cream puffs.

The recipe is simple. Take one cup of unthawed frozen raspberries (you can buy them in the frozen food section), add sugar and cinnamon to taste and stir.

Sunday, May 3, 2009

Tasty Tilapia Piccata


I love fish, but I hate the price. It just keeps going up, an ominous sign that overfishing and environmental degradation have reached the dinner table. Just check out the price of wild salmon. A few years ago, it was a pricey $10 or $12 a pound. Now you're lucky if it's under $20 a pound.

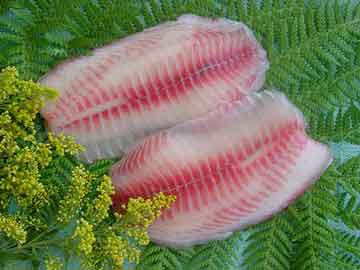
Tilapia, meanwhile, stays steady as rock: a consistent $7.99 a pound, day in day out. That's because it's farmed. From what I've read, it's also environmentally friendly to eat. You aren't contributing to the destruction of a species or the earth by tucking into a tilapia fillet, or so I read.

Unfortunately, it's a fish largely sans flavor. And it dries out quickly if you cook it even a minute too long.

I have found one great recipe for tilapia (soak it in milk, bread it, dot it with butter and blast it in a 500 degree oven for 10 to 15 minutes. Serve with lemon) and long searched for a second one. This evening, I decided to experiment. Why not pan fry the fillets in butter and olive oil and make a piccata sauce?

I love piccata sauces, a combination of olive oil, butter and chicken stock. Chicken cutlets piccata is one of my standards.

I salted and peppered the fish, dredged it in flour and seared the fillets in one tablespoon butter and one tablespoon olive oil. Unfortunately, I used too small a pan and struggled to keep them in one piece, After about 10 or 12 minutes a medium high heat, they were done.

I took the fish out of the pan and dumped in about a quarter to half cup of chicken broth, cooking for a couple of minutes while scrapping up all the goodness. Once the liquid thickened, I added a tablespoon of lemon juice and half a tablespoon of butter and dumped the sauce over the waiting fish.

The result was outstanding. The fish was flaky and moist, the dusting of flour having locked in the moisture. The sauce gave the fillets a buttery -- but not too buttery -- lemony flavor. It was like eating little pillows of flavor, melt-in-your-mouth good. It was so good, my daughter coaxed me into giving her part of my portion (can't leave a growing kid hungry, I say).

An excellent recipe, simple, quick and tasty.

Monday, April 6, 2009

Zesty Orange


The other night, I made a Thai stir fry that called for an orange. I sliced off the orange rind and left it on the counter. My daughter decided to make a dinner of orange zest for her dolls. She retrieved our zester from the drawer and proceeded to carefully shave the orange skin into confetti. The dolls had a fine dinner.

As I was cleaning up, I thought, why waste the zest? All that flavor just sitting there waiting to be put in something.

I pulled out my cookbooks and found a few recipes for orange cake, but nothing that was quick, easy and for which I had all the ingredients. Then I found a recipe for orange muffins. It was perfect.

I mixed the ingredients, popped it in the oven and in about 20 minutes, viola, orange muffins. They tasted fantastic, like eating a glass of orange juice, only richer.

Irony of ironies, my daughter, who did all the heavy lifting by zesting the orange, didn't like them.

Here's the recipe:

Mix two cups all-purpose flour with three tablespoons sugar, one tablespoon orange zest, 1/2 teaspoon salt and 3 teaspoons baking powder. Melt 4 teaspoons of butter and let cool. Add butter to 3/4 cup of milk, one egg and beat. Add to dry mixture plus 1/4 cup orange juice. Stir 12 to 15 times until just mixed. Do not over stir. Put in a 12 cup muffin tin and bake at 425 degrees for 20 to 25 minutes.

Tuesday, March 24, 2009

The Perfect Bread


I've been doing this nearly three months and still have not blogged about one of my favorite food activities: baking bread.

A number of years ago, my wife gave me a Kitchaide mixer and I was off to the races. I have experimented with many bread recipes and bake most of our bread. I bake two loaves at a time, cut them in half (unless they are whole wheat or rye which keep better so a whole loaf stays fresher longer) and freeze them. They unthaw quickly, about three to four hours, and lose virtually none of their taste.

By far the best bread book I have found is the Bread Baker's Apprentice by Peter Reinhardt. I bought this book years ago at the Reading Terminal Market in Philadelphia (a very cool place, but that's another story) and have still only baked about a third to half the recipes.

Unlike most cookbooks, every one of Reinhardt's recipes comes out perfectly. His secret is pre-ferments, relatively small portions of dough that you mix the night before, allow to rise for several hours and then keep overnight or longer in the fridge. Reinhardt is a food scientist and his book has long, highly technical discussions on the chemical reactions that result from this process, but the bottom line is fantastic tasting bread.

This weekend I made what my wife loves calls "the perfect bread": Reinhardt's potato rosemary bread. The key is the leftover mashed potatoes which give the bread a unique smoothness that perfectly compliments the cool of the rosemary and the airiness of the loaf.

Here is the recipe:

The night before mix together 2 1/2 cups unbleached bread flour, half a teaspoon of instant yeast and 3/4 to 1 cup of warm water. Form into a ball and knead for four to six minutes. Place in an oiled bowl, cover with plastic wrap and let rise two to four hours until doubled in size. Remove and knead to de-gas. Return to bowl, cover with plastic wrap and put in fridge overnight. It will keep several days.

About an hour before making bread, remove the dough from the fridge and use a pastry cutter to cut it into 10 pieces. Cover with a towel and let sit about an hour.

Put pieces in the bottom of a stand up mixer bowl with a cup of leftover mashed potatoes and a tablespoon of olive oil. In a separate bowl, mix 3 cups plus 2 tablespoons bread flour, two tablespoons chopped fresh rosemary, 1 1/2 teaspoons salt and 1 1/4 teaspoons instant yeast. Mix and add to mixing bowl along with 3/4 a cup plus 2 tablespoons water.

Mix with a mixing hook until it forms a ball. Turn out onto floured surface and knead for 8 to 10 minutes. Put in bread bowl and cover with plastic wrap. After two hours, dough should have about doubled. Remove and cut into two pieces. Flattened out each piece, roll into loaves and put in oiled loaf pans. Cover and let rise for about an hour.

Place in 400 degree oven and bake for about 20 minutes, turn and bake another 15 to 20 minutes until loaves should hollow when thumped on bottoms. Put on rack to cool.

Wednesday, March 4, 2009

Roast Chicken


Sounds so simple, but like many things in life, it is and it isn't.

I've been roasting chickens forever and have experimented with a dozen variations. I've tried slower, longer roasts and hotter, faster ones. I've drizzled lemon juice, smeared butter or painted on olive oil in search of crispy, tasty skin. I've concocted herb and mustard pastes and delicately worked them between skin and breast.

The challenges are: a bird done enough to kill anything that would send your diners galloping to the toilet, but not so done that the meat turns to cardboard. Second, infusing as much flavor as possible, especially challenging with the breast. Modern chickens don't have a ton of natural flavor, so forcing some culinary excitement into them is never ending quest.

After endless experimentation, I've settled on the following recipe:

One three to four lb chicken (too big gets too tough)
Bunch of fresh herbs (basil, oregano, tarragon, thyme, or whatever floats your boat)
One to two gloves of garlic (optional)
Two to three table spoons olive oil
Salt and pepper to taste
Kitchen string

Preheat oven to 425 degrees Fahrenheit

Wash chicken thoroughly and pat dry with paper towels. Shove herbs and garlic into the chickens cavity. Don't be shy about the amount of herbs. You want your chicken to look like it's sprouting a plant. Dress the legs with the kitchen string, closing the cavity.

Paint the olive oil all over the chicken. Salt and pepper to taste. Place chicken on roasting rack inside roasting pan and put in oven. Roast for 40 to 45 minutes or until the skin is nicely brown. Lower the temperature to 400 degrees and roast another 25 to 35 minutes. Remove and stick thermometer into the thickest part of the breast. It's done at 180 degrees.

This recipes yields a juicy, flavorful, tender chicken every time. The herbs cook and steam inside the bird (it's a good idea to wet them to assist the steaming process), infusing the meat with flavor and the olive oil yields a tasty skin.

You can serve as a main course with leftovers or carve it cold for sandwiches.

Tuesday, February 24, 2009

Whine About Wine

I recently tried the sauteed steak and wine recipe in the January Food & Wine magazine. I used an inexpensive Bordeaux that my wife and I like; it tasted sublime, one of the best new recipes I've tried in a long time.

Last week, I set out to make the dish again. I tend to use whatever wine I have open when I cook. Instead of a dry Bordeaux, I had a Sauvignon Blanc with a fruity front and a dry finish. It'll be fine, I thought. Wine's wine.

Wrong-o. I executed the dish as I did the first time (I slivered two instead of four garlic gloves, but otherwise followed the directions) and at the end poured my two-thirds of a cup of wine into the pan. The result -- while still pretty good -- was not nearly as tasty as the first trial. The resulting sauce -- incredibly flavorful the first time I made it -- had an almost sour aftertaste.

I'll have to try this recipe to confirm it was the wine, but I'm nearly certain. It was the only difference. The lesson: whine about your cooking wine. What you use does matter. You're not being a wine snob if you eschew the Turning Leaf someone brought to a party for a higher quality, slightly more expensive French vintage.

Monday, February 16, 2009

Stuffed Shells and Marinara

Yesterday, my in-laws, my wife's sister, her husband and their kids came to Sunday dinner. That made nine mouths to feed, many more than I'm used to.

What to make? I've had my share of cooking-for-the-masses missteps over the years. I've learned the hard way to keep it simple and quick. Don't try that fancy dish requiring 10 ingredients, seven steps and constant attention. Cooking large portions magnifies difficulty, while making the necessary attention to detail tougher. You always end up rushed and the food never comes out as good as a smaller portion. Plus, you get stuck in the kitchen while everyone else is talking and having fun.

So when guests come, I stick to tried and true dishes that you can prep beforehand and just throw into the oven.

I thought about this wonderful dish, pancetta chicken, that I blogged about before, but then settled on stuffed shells. None of us are Italian, but because most of us grew up in Connecticut with its large Italian-American community, we love Italian (or to be more exact, Italian-American) food.

Without a family marinara sauce, I experimented for years with different recipes, many of them requiring multiple ingredients including carrots, sugar, chicken broth, etc. Often they required hours of simmering, turning the making of simple sauce into a culinary Bataan Death March. I didn't even venture the Big Kahuna of marinaras, the Sunday Gravy, in which a beef roast simmers in the sauce literally all day.

Then I tried the recipe in the Rao's Cookbook, the simplest I'd yet seen. It was brilliant, and I've used it ever since. Rao's is a legendary Italian restaurant in East Harlem that you can't get into unless you know someone. For you Sopranos fans, Rao's owner Frank Pelligrino played FBI agent Frank Cubitosi.

I made the marinara the day before. Here's the recipe with some minor adjustments from me:

Six tablespoons minced onions
Two to three cloves minced garlic
Half a cup of extra virgin olive oil
Four 28 oz cans of plum tomatoes, best quality available
Two teaspoons dried basil or a dozen to two dozen torn basil leaves, depending on taste
Two to three shakes of ground oregano
Salt and pepper to taste

Mince garlic and onions. Pour tomatoes into a large bowl and hand crush them, removing any hard parts.

Pour olive oil into a large, heavy pot (I use a Creuset Dutch oven) and set to low medium. Saute onions until translucent, about seven minutes. Do not brown. Add garlic and cook for 30 seconds, again being careful not to brown.

Add tomatoes and salt and stir until olive oil is incorporated into the tomatoes. Bring a boil and then simmer for an hour to 90 minutes or more, depending on preferred thickness.

Add basil and oregano and simmer for five minutes.

When you hit it just right, this sauce is fluffy, flavorful and light. My daughter loves it so much she sometimes spoons into her mouth without pasta.

This recipe yields about seven to eight cups. Use what you need and freeze the rest.

Next, I made the shells. Pretty simple. The rule is 1 lb ricotta per per half lb mozzarella, plus grated Peccorino Romano cheese to taste. Add an egg, mix and spoon into pre-cooked shells a little underdone so they are easier to work with and don't overcook in the oven. This yields about 24 shells.

Put down a bed of marinara in baking dishes, lay the shells on top and then drizzle sauce over the tops followed by more grated Peccorino Romano. Bake at 375 degrees for about 25 minutes. Let sit five minutes before serving.

Unlike many shell dishes, which are often slathered in too much cheese, this one is light and airy. You don't feel like there's a car battery sitting in your stomach afterwards.

The shells were a huge hit. I made 48 expecting to have about ten left over. There were three by the time everyone had seconds and even thirds.

Monday, January 12, 2009

Chicken Salad a la Low Cholestoral

One of the best things about this blog is that it's encouraging me to innovate. I admit to being too rigid when I cook. I have a tendency to stick to the written instructions no matter what, which sometimes leads to disaster.

Take Sunday before last. I decided to make Pad Thai, a dish that my daughter and wife love. The recipe said to soak the rice noodles in water until they softened instead of boil them. Beset as I usually am by boiled noodles turning into a clump shaped like a mini-football, I decided to give it a try. The recipe said soak 15 minutes after which time the noodles were still the consistency of pick up sticks. I waited and waited and waited. After half an hour the noodles were somewhat pliable, so I forged ahead, reasoning that they would soften during the stir fry.

If only it were true. The noodles were still crunchy as a granola bar by the time the dish was done. My wife and daughter passed in favor of the leftover Indian food in the fridge.

So in the spirit of experimentation, I am venturing into the realm of mayonnaise-less chicken salad (that damn cholestoral thing again). On the advice of the doctor, I've been buying cooked chickens at the store and making sandwiches out of the white meat. Not bad, but a little boring and bland. What could I do for chicken salad without mayonnaise? I asked myself.

Recalling a Jamie Oliver roast chicken recipe using whole grain mustard (I like Jamie's food, although I find him somewhat creepy), I cut up a chicken breast, mixed in about a tablespoon of whole grain mustard and added about a third of a rib of celery. A little salt and pepper and it was done. I took a bite. Not bad. The chicken had a pleasantly tangy taste and the celery added a nice crunch. I made it again this morning using a whole chicken breast and it turned out well.

Here's a basic recipe. If readers try it, let me know how it comes it and whether they have any suggestions:

One cooked chicken breast, shredded
Two to three tablespoons of whole grain mustard
One half a celery rib chopped
Salt and pepper to taste